[nextpage title=”An Introduction to Backscatter Removal”]
Last week, I had the pleasure of speaking about technical diving and underwater photography to the Whalers Dive Club in Canoga Park, California. It was a great crowd, and the attendees were every speaker’s dream: they both laughed at my jokes and asked engaged, thoughtful questions!
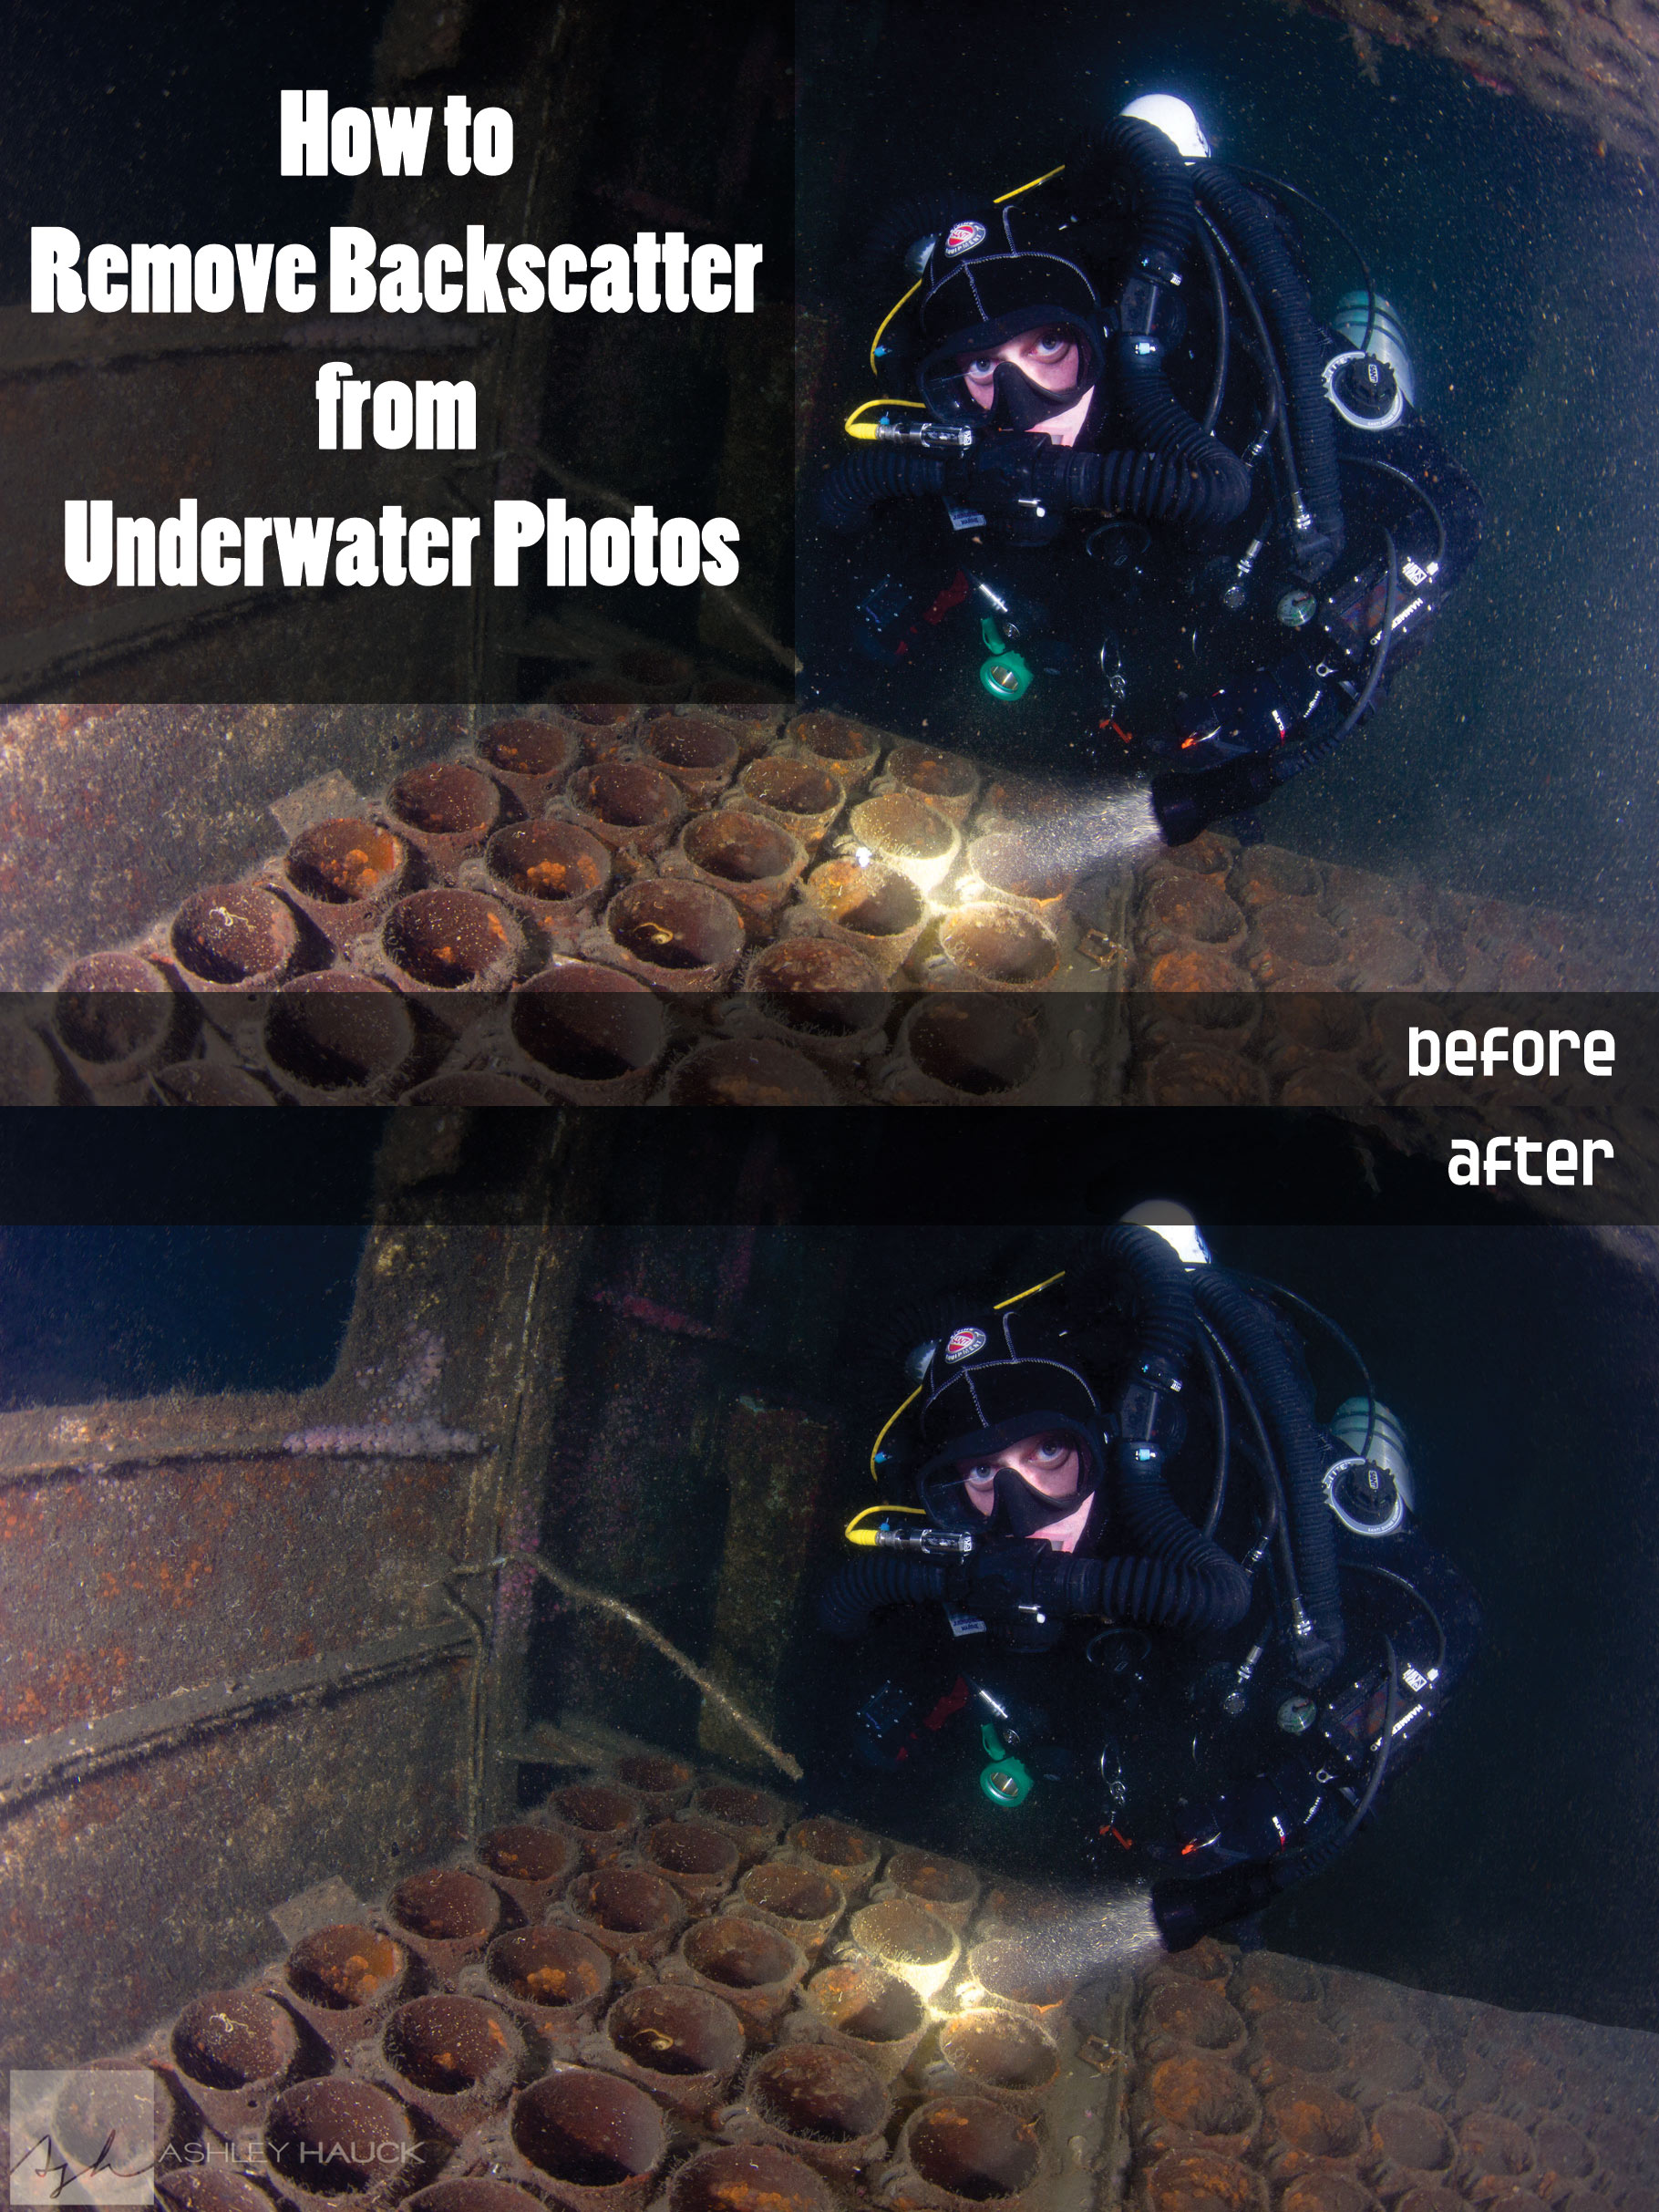
One of the questions that stood out, and that I frankly do get asked all the time, is “Do you post-process your photos?” My immediate, emphatic admission of “YES!” drew laughs from the audience, but it wasn’t a joke; I firmly believe that post-processing, especially for underwater photography, is nothing to be avoided or ashamed of. My standard workflow typically includes color and contrast adjustments, sharpening, and–the bane of every underwater photographer’s existence–backscatter removal.
“Post-processing in underwater photography is nothing to be avoided or ashamed of!” (Tweet this)
Sometimes we underwater photographers are fortunate enough to dive and shoot in that gin-clear tropical water, and backscatter is just a few errant specks of sand on the edge of the frame. If this describes you, lucky you! More often, though, and especially in technical wreck diving, backscatter can be a real problem. Wrecks can be silty, and deep wrecks with low ambient light require strobing, and strobing + silt is an equation for a backscatter disaster.
Of course we endeavor to “get it right in-camera” as often as possible, and correct strobe placement can considerably reduce backscatter, but there’s frequently some (or a lot!) of backscatter left behind that we want to get rid of.
The following tutorials assume you are using Adobe Photoshop Lightroom 5 and Adobe Photoshop CC. Read on to learn how to wipe out backscatter in your underwater photos.
[nextpage title=”How to Remove Backscatter in Lightroom”]
3 Steps for Basic Backscatter Removal
Since my first step is always to load all my photos into Lightroom anyway, I will do some light preliminary editing in Lightroom. Sometimes a little Lightroom love is all an underwater photo needs.
Here’s our first photo, a shot of some toilets inside the bow of the HMCS Yukon wreck in San Diego. We’ll open it up and click over to the Develop Module. Here’s the photo as it looks straight out of the camera:

Step 1: I like to tweak the white balance pretty much first thing. Sometimes, a change in the white balance can alter whether backscatter is visible, so it’s best to get that out of the way first. So here’s the photo after I edit the white balance to bring back some more realistic color:

Step 2: It’s not terrible, but it can still use some touching up. So in the Develop Module, we’ll click on the “Spot Removal” tool just beneath the histogram (or hit “Q” on your keyboard), adjust the size of the brush using the bracket keys [ and ] so that the brush is just bigger than your backscatter, and start clicking away on those pesky little white dots. Lightroom will automatically find a source area of the image to clone over the white specks. When you’re done, hit enter on your keyboard, and Lightroom will exit you out of the Spot Removal tool.

It’s OK to leave some backscatter in your underwater photos. Just remove the distracting bits! (Tweet this)
Step 3: Super easy, right? After I got rid of most of the backscatter (I’m not super fussy about getting all of it, just the distracting bits), I fiddled with my white balance and contrast some more, stamped on my watermark, and here’s the finished product. I think this would be fun as a print in a wreck diver’s bathroom!


[nextpage title=”How to Remove Backscatter in Photoshop”]
7 Steps to Removing a Lot of Backscatter in Photoshop
It’s nice to do all my editing in Lightroom, but in all honesty, I don’t love Lightroom’s Spot Removal tool. It feels clunky to me, and it’s tough to use for precise editing or situations where it’s difficult to find a source area to clone. If I have a lot of backscatter to remove, I bust out the big guns and load the image into Photoshop.
If you have a lot of backscatter to remove from an underwater photo, Photoshop is your best bet. (Tweet this)
Here’s another shot from inside the Yukon wreck. This one is from inside the magazine room. There’s just no way you’re going to squeeze through the entrance without dislodging some (okay, quite a bit of) silt.

Step 1: Once again, first things first, I adjust the white balance sliders to get the colors how I want them. We find then that a lot more backscatter has become visible as a result of the white balance shift:

Step 2: This could certainly be fixed in Lightroom, but I prefer Photoshop’s interface for this kind of work. So I right-click the image and navigate the menus to open it in Adobe Photoshop CC.

Warning: stuff’s about to get really tedious in a minute.
Step 3: So now we’re in Photoshop and it’s about to get real. I’ll hit J on my keyboard to toggle to the Spot Healing Brush Tool. Make sure that the mode is set to “Darken” and the type to “Content-Aware.” You can create a duplicate background layer to work on, if you want (I don’t always do this, but it is a good practice), with the keystroke Command-J.
Now adjust your brush size again using the bracket keys and get clicking on those backscatter specks! I’ll go make us some sandwiches. Holler when you’re finished.

Okay, you’re all done? Let’s have a look.

Step 4: Here, we’ve removed most of the glaringly bright backscatter, but we’re left with a lighter, hazy area that is still pretty ugly and distracting. This is where we break out the Burn Tool (O) to selectively darken it up. We’ll duplicate the layer again (Command-J) and set our Range to “Highlights” so that we only darken the brightest parts of the image.
Now we draw over the hazy area with a light hand. It’s easiest to work with the Burn Tool in light layers. If it’s already too dark, we can lighten it up either by reducing the opacity of the layer, or by starting over with a lower value for Exposure.
It’s looking better, but it’s still not there yet:

Step 5: So now we have two options: we can either continue using the Burn Tool until the hazy area in the photo blends, or we can use Curves to tweak the contrast and blend that area in one fell swoop. I’m going to go with Door Number Two here. Duplicate the layer again, and then open up the Curves Menu (Image>Adjustments>Curves or Command-M) and drag the curve until the shadows darken. I like to start around the top of the bottom-left square.

Step 6: It’s way too dark at this point. That’s okay! Now, dial back the opacity of the layer until the shadows look better near that hazy spot on the right side. I brought it back to about 80%. It’s still too dark everywhere else, though.

Step 7: Finally, we’ll make the Curves layer into an adjustment mask, so we can apply that Curves adjustment only to the right hand side of the image. With the Curves layer selected, hold down the Option key while clicking the “Add Layer Mask” button at the bottom of the Layers menu. Suddenly your Curves adjustment will disappear. Now we get to paint it back on in just the places we want it!
Next, we’ll click the black rectangle next to our layer to select the layer mask, then select white as our foreground color. Hit the B key to toggle the paintbrush, select an appropriately sized and shaped brush, and start painting on the areas that need to be darker. If it’s hard to see what you’re doing, you can turn the layer opacity back up to 100% and dial it back later.

That’s it! At this point, I’ll do some sharpening, add my watermark, and the image is ready to go:


[nextpage title=”Simple Background Backscatter Removal”]
The Easiest Way to Remove Backscatter
If there’s no detail in your underwater photo where the backscatter is, you’re in luck–removing backscatter is going to be easy. An example of when you might use this technique is when there are backscatter particles in the water column in the background of your photo.
It’s really simple to remove backscatter from the background of an underwater photo! (Tweet this)
Here’s an example of an underwater photo that’s a good candidate for the easiest backscatter removal method. You can see that most of the backscatter is in a relatively detail-free area of the water column:

We’ll be using the Dust & Scratches Filter in Photoshop to clean up the backscatter in this one.
Step 1: First, duplicate your background layer. Then, select the Lasso Tool (L) and draw a line around the area in the water where your backscatter is:

Step 2: Now let’s go to Filter>Noise>Dust & Scratches. We’ll adjust the Radius until we remove the largest backscatter spots, then adjust the Threshold until the spots completely disappear. Press OK when done:

Step 3: Repeat the Lasso-Dust & Scratches process for other remaining areas of water.
Step 4: Clean up any remaining backscatter around detailed areas with the Spot Healing Brush Tool.
That’s it! I just processed that photo and removed a significant amount of the backscatter in under 5 minutes. You’ll notice that the Dust & Scratches method preserves the color gradient in the water to keep it looking pretty natural.
The final result:

Photoshop is not a dirty word in underwater photography! (Tweet this)

So there you have it: three different ways to remove backscatter in your underwater photos using Lightroom and Photoshop.